Challenge Tutorial
In this challenge tutorial you will learn how to draw using cross hatching.
Hatching
Cross hatching is a derivative of a more basic concept called hatching.
With hatching you draw using parallel lines.

To adjust the tonal value of an area, you draw the lines closer or further apart. In the hatched lines below you can see how the area appears darker than the hatched line area above.

Definition of Cross Hatching
Two or more sets of parallel lines drawn at different angles to each other in order to form patterns and tonal values.
Cross Hatching Basics

To get cross hatching you simply add one or more extra sets of hatching over the first at a different angle.
As with hatching, the closer your hatches are to each other, the darker the tonal value appears.

Take a look at the tonal value of the cross hatch above. Now compare it to the tonal value of the cross hatching below:

The tonal value is roughly the same as the previous one. This time however the tonal value has been built up with hatches in multiple directions. In fact if you look carefully you will see that each set of hatches are further apart than the previous example.
This has allowed us to create the same tonal value, but a different texture. Keep this in mind as you cross hatch.
Practical Cross Hatching

We are now going to do a practical exercise to learn how to create various tonal values using cross hatching.
If you would like to follow along please download and print out the pdf worksheet below:
The worksheet should look something like this once printed:

We will start in the row directly below the shaded tonal chart.
In the lightest, left hand block add cross hatching that is quite far apart like this:

To draw the lines I have used a 6B pencil with gentle pressure.
As you draw rotate the pencil in your fingers after every stroke or two. This keeps the tip of the pencil sharp giving you nice crisp hatched lines.
Use the printed tonal chart in the bar above to compare tonal values.
If your tonal value is too light, add more hatches.
If your tonal value is too dark, use your eraser to erase the lines and start again using wider parallel lines.

Now do the same in the block next to it. This time we need a darker tonal value, so use hatches that are closer to each other as shown above.

To complete the central block use even closer hatches.
If this is not dark enough, add horizontal and vertical hatches in as well. (This is what I have done in my central block)

The tonal value for the next block needs to be quite dark.
If you are using a pencil to cross hatch then you have an added tool in your arsenal. You can press harder and softer to get lighter and darker strokes onto the paper.
I have used this added pressure to get the darker tonal value for this block. As you can see the amount of hatching is pretty much the same as the previous, central block.
This just shows how handy the ability to add pressure is.
If you are hatching using a pen then unfortunately this technique is not available to you so just keep adding more hatched lines in different directions until you have a matching tonal value.

The final block is black so use a hard pressure as well as very close hatches to fill it in.
My hatches are so close they often overlap each other. In other words you are basically colouring in this block.
As you do however, still do it in a hatching fashion by using the same directions as for the previous blocks. As you can see the lines are still visible, retaining the cross hatched effect despite the very dark tonal value.
How to Shade Using Cross Hatching

To shade the next block we will start with diagonal lines in this direction /
Start at the left hand side using wide parallel lines as per the block above it.
As you work your way to the right hand side gradually make your lines closer and closer together in order to form a shading like this:

As you can see by the time you get to the right hand side you are colouring in.
This has already given us a beautiful continuous shading.
If this is the tonal value and shading you need then you can stop at this point.
Let’s continue by adding diagonal hatched shading in the opposite direction:

By adding the cross hatched shading we have a lot more texture as well as more contrast between the left and right have sides.
Now we can add a set of vertical hatches in the same way:

The darker values are filling up nicely now.
We are going to add one more direction – horizontal lines.
As the actual shading is horizontal we can’t use the technique of parallel lines closer and further apart.
As a result we will now use longer and shorter lines to complete the shading.
Here you can see I have marked the different lengths I have used to create the horizontal shading:

In other words you start off with a few long lines going all the way across the block.
Then you add shorter lines going from the right hand side to the left.
Then a series of shorter and shorter lines.
The left hand side has less lines and the right hand side has a ton of lines giving us the shading we need.
To further illustrate this here is the same block but with only the horzontal lines drawn in:

You will often find yourself using this technique when cross hatching.
There is one more important concept that we need to look at in order to draw accurate cross hatched drawings.
This concept is cross contour lines.
Cross Contour Lines

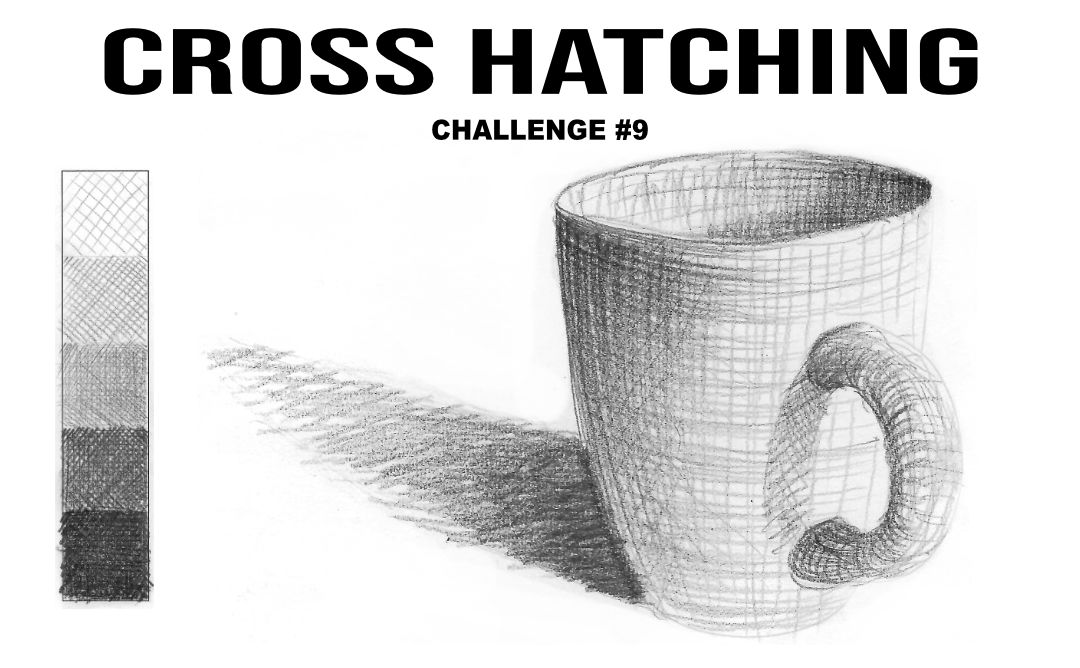
In real life when drawing we will seldom be drawing flat objects. Our objects will be three dimensional like the mug above.
We need a way to draw this mug using parallel hatched lines.
If we use straight cross hatched lines as we have up to this point in the tutorial, we would get a version of the mug on the paper, but we will find it difficult to fully convey the roundness of the mug.
Here I have drawn the mug using only diagonal, vertical and horizontal cross hatching so you can see:

It looks okay, but it feels as though something is missing.
This is where cross contour lines come in.
Cross contour lines are lines that follow or conform to the shape of the object.
For example if we were to draw a series of horizontal parallel lines around our mug, they would look like this:

Notice how the lines are not straight, but curved to conform to the shape of the mug.
The same would happen to any lines we add to the mug, regardless of their direction.
When we draw our cross hatching we need to bend and bow the lines to follow the contour of the object we are drawing.
When doing this our final drawing looks like this:

Compare this to the previous mug and you will agree that the drawing is a LOT better as a result. It looks round and three dimensional now.
If you want to watch how I draw this mug, play the video at the top of the page.
You can use cross hatching to draw quick sketches when on holiday or for shading practice in the studio. Cross hatched drawing are also great for testing out a composition before starting a painting.
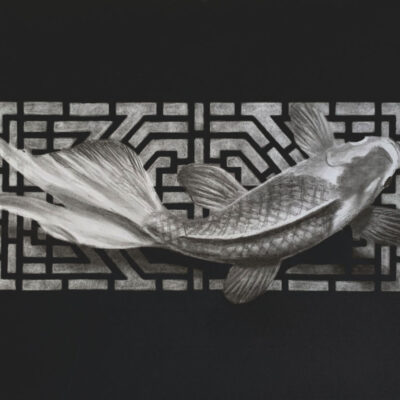
You can even use it to draw complete, stand alone artworks like this one:

This drawing is a class on the website about How to Draw Cross Hatched Fish. You can also learn more about cross hatching in the Lets Draw Pencil Drawing Course.
Tip
If you are not a member yet, you can join for free by signing up to our mailing list below.
You will then get a coupon code to unlock any class on the site for free as well as get lifetime access to the forum and the challenges.